Why You’ll Love This Recipe
There’s so much to adore about Homemade Red Velvet Brownie Dippers. Here’s why they’re a must-try:
- Perfectly Portable : Bite-sized and easy to share, these dippers are ideal for parties, potlucks, or gifting.
- Rich and Fudgy : The brownie base is dense, chewy, and packed with chocolatey goodness.
- Signature Red Velvet Flavor : A hint of cocoa and a splash of vanilla create that classic red velvet taste.
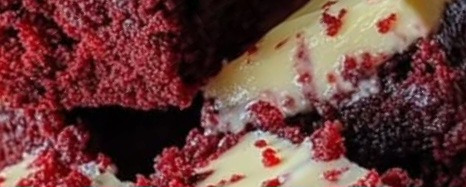
- Customizable Dipping Options : Pair with cream cheese frosting, melted chocolate, or caramel for endless flavor combinations.
- Make-Ahead Friendly : Bake ahead of time and store for quick treats anytime.
Ingredients You’ll Need
The secret to these brownie dippers lies in their simple yet indulgent ingredients. Here’s what you’ll need:
For the Brownies:
- 1 cup all-purpose flour
- ½ cup unsweetened cocoa powder
- ½ teaspoon baking powder
- ¼ teaspoon salt
- ½ cup unsalted butter (melted)
- 1 cup granulated sugar
- 2 large eggs
- 1 teaspoon vanilla extract
- 2 tablespoons red food coloring (gel or liquid)
- ¼ teaspoon white vinegar
For Dipping:
- Cream cheese frosting (store-bought or homemade)
- Melted white chocolate
- Melted dark chocolate
- Sprinkles (optional, for decoration)
Step-by-Step Instructions
Ready to whip up these decadent, dippable brownies? Follow these easy steps:
Step 1: Preheat Your Oven
Preheat your oven to 350°F (175°C) . Line an 8×8-inch baking pan with parchment paper or lightly grease it for easy removal.
Step 2: Mix the Dry Ingredients
In a medium bowl, whisk together the flour, cocoa powder, baking powder, and salt. Set aside.
Step 3: Combine Wet Ingredients
In a large mixing bowl, whisk together the melted butter and sugar until smooth. Add the eggs one at a time, beating well after each addition. Stir in the vanilla extract, red food coloring, and white vinegar until the batter turns a vibrant red.
Step 4: Combine Wet and Dry Ingredients
Gradually add the dry ingredients to the wet ingredients, mixing just until combined. Be careful not to overmix, as this can make the brownies tough.
Step 5: Bake the Brownies
Pour the batter into the prepared baking pan and smooth the top with a spatula. Bake for 20–25 minutes , or until a toothpick inserted into the center comes out with a few moist crumbs (not wet batter). Avoid overbaking to keep the brownies fudgy.
Step 6: Cool and Cut
Allow the brownies to cool completely in the pan. Once cooled, lift them out using the parchment paper and transfer them to a cutting board. Cut the brownies into small rectangles or squares, about 1–2 inches in size, to create the “dippers.”
Step 7: Prepare the Dipping Options
Set up your dipping station with bowls of cream cheese frosting, melted white chocolate, melted dark chocolate, and sprinkles. Dip each brownie piece halfway into your chosen coating and place it on a parchment-lined tray. Add sprinkles if desired.
Step 8: Chill and Serve
Let the coatings set by chilling the dipped brownies in the refrigerator for 10–15 minutes. Serve chilled or at room temperature and enjoy the gooey, dippable goodness!
Why This Recipe Works So Well
The magic of these Red Velvet Brownie Dippers lies in their balance of flavors and textures. The cocoa powder provides a deep chocolate flavor, while the red food coloring and vinegar give them that signature red velvet tang. The fudgy brownie base is soft and chewy, making it perfect for pairing with creamy frostings or rich chocolate dips. Together, these elements create a dessert that’s as indulgent as it is fun to eat.
Variations to Try
While the classic version is divine, here are some creative ways to switch things up:
- Add Nuts : Fold chopped pecans or walnuts into the batter for added crunch.
- White Chocolate Swirl : Swirl melted white chocolate into the batter before baking for a marbled effect.
- Gluten-Free Option : Substitute all-purpose flour with a gluten-free flour blend to make this recipe suitable for dietary restrictions.
- Mini Brownie Bites : Use a mini muffin tin to bake individual brownie bites for a cute presentation.
- Festive Touch : Use holiday-themed sprinkles or colored chocolate coatings for a seasonal twist.
Tips for Success
- Use Gel Food Coloring : Gel food coloring provides a more vibrant red color without altering the texture of the batter.
- Don’t Overbake : Keep an eye on the brownies during the last few minutes of baking to ensure they stay fudgy.
- Chill Before Cutting : Cooling the brownies completely makes them easier to cut into neat, even pieces.
- Experiment with Dips : Try dipping in caramel, peanut butter, or marshmallow fluff for unique flavor combinations.
- Freeze for Later : Store baked brownie dippers in the freezer for up to 3 months. Thaw at room temperature before serving.
Serving Suggestions
These Red Velvet Brownie Dippers are incredibly versatile and pair well with a variety of beverages and desserts. Here are some ideas to enhance your experience:
- Coffee Pairing : Serve alongside a hot cup of coffee or latte for a cozy treat.
- Ice Cream Combo : Warm a brownie dipper slightly and serve with a scoop of vanilla ice cream for an indulgent sundae.
- Dessert Platter : Include them on a dessert table alongside cookies, cupcakes, and fruit skewers.
- Gift Idea : Package them in decorative boxes or jars tied with ribbon for thoughtful homemade gifts.
- Party Favorite : Arrange them on a platter with dipping sauces for a fun, interactive dessert.
Final Thoughts
With their rich cocoa flavor, vibrant red color, and endless dipping possibilities, Red Velvet Brownie Dippers are a dessert worth making again and again. Whether you’re hosting a gathering, celebrating a special occasion, or simply looking for a fun kitchen project, this recipe delivers big on taste and satisfaction.
So, the next time you’re in the mood for something sweet and indulgent, give these dippers a try. Trust us—they’re quick, easy, and absolutely delicious!
Have you tried this recipe yet? Share your thoughts, tips, and variations in the comments below. Happy baking!
Enjoy.